Latest Entries »

Showing posts with label wi-fi. Show all posts

.: How to configure Internet Connection Sharing in Windows XP :.

.: How to configure Internet Connection Sharing in Windows XP :.


How to use Internet Connection Sharing

To use Internet Connection Sharing to share your Internet connection, the host computer must have one network adapter that is configured to connect to the internal network, and one network adapter or modem that is configured to connect to the Internet.

On the host computer

On the host computer, follow these steps to share the Internet connection:
  1. Log on to the host computer as Administrator or as Owner.
  2. Click Start, and then click Control Panel.
  3. Click Network and Internet Connections.
  4. Click Network Connections.
  5. Right-click the connection that you use to connect to the Internet. For example, if you connect to the Internet by using a modem, right-click the connection that you want under Dial-up.
  6. Click Properties.
  7. Click the Advanced tab.
  8. Under Internet Connection Sharing, select the Allow other network users to connect through this computer's Internet connection check box.
  9. If you are sharing a dial-up Internet connection, select the Establish a dial-up connection whenever a computer on my network attempts to access the Internet check box if you want to permit your computer to automatically connect to the Internet.
  10. Click OK. You receive the following message:
    When Internet Connection Sharing is enabled, your LAN adapter will be set to use IP address 192.168.0.1. Your computer may lose connectivity with other computers on your network. If these other computers have static IP addresses, it is a good idea to set them to obtain their IP addresses automatically. Are you sure you want to enable Internet Connection Sharing?
  11. Click Yes.
The connection to the Internet is shared to other computers on the local area network (LAN). The network adapter that is connected to the LAN is configured with a static IP address of 192.168.0.1 and a subnet mask of 255.255.255.0

On the client computer

To connect to the Internet by using the shared connection, you must confirm the LAN adapter IP configuration, and then configure the client computer. To confirm the LAN adapter IP configuration, follow these steps:
  1. Log on to the client computer as Administrator or as Owner.
  2. Click Start, and then click Control Panel.
  3. Click Network and Internet Connections.
  4. Click Network Connections.
  5. Right-click Local Area Connection, and then click Properties.
  6. Click the General tab, click Internet Protocol (TCP/IP) in the This connection uses the following items list, and then click Properties.
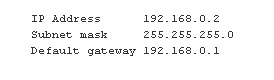
  7. In the Internet Protocol (TCP/IP) Properties dialog box, click Obtain an IP address automatically (if it is not already selected), and then click OK. Note You can also assign a unique static IP address in the range of 192.168.0.2 to 192.168.0.254. For example, you can assign the following static IP address, subnet mask, and default gateway:
      1. In the Local Area Connection Properties dialog box, click OK.
      1. Quit Control Panel.

To configure the client computer to use the shared Internet connection, follow these steps:
  1. Click Start, and then click Control Panel.
  2. Click Network and Internet Connections.
  3. Click Internet Options.
  4. In the Internet Properties dialog box, click the Connections tab.
  5. Click the Setup button. The New Connection Wizard starts.
  6. On the Welcome to the New Connection Wizard page, click Next.
  7. Click Connect to the Internet, and then click Next.
  8. Click Set up my connection manually, and then click Next.
  9. Click Connect using a broadband connection that is always on, and then clickNext.
  10. On the Completing the New Connection Wizard page, click Finish.
  11. Quit Control Panel.
When you now start Microsoft Internet Explorer, the client computer will try to connect to the Internet by using the host computer's shared Internet connection.

Troubleshooting

When you turn on Internet Connection Sharing on the host computer, the host computer's LAN adapter is automatically assigned the IP address of 192.168.0.1. Therefore, one of the following situations may occur:
  • IP address conflict Each computer on the LAN must have a unique IP address. If more than one computer has the same IP address, an IP conflict occurs, and one of the network adapters turns off until the conflict is resolved. To resolve this conflict, configure the client computer to automatically obtain an IP address, or assign it a unique IP address.
  • Loss of network connectivity If your network is configured with a different IP address range than Internet Connection Sharing uses, you will lose network connectivity with the host computer. To resolve this issue, configure the client computers to automatically obtain an IP address, or assign each client computer a unique IP address in the range of 192.168.0.2 to 192.168.0.254.

Internet radio on your mobile...

Internet radio on your mobile...


Mundu Radio is now available on Nokia and Java enable phones as well. Enjoy a number of internet radio stations right from your Nokia and Java enable mobiles.

Nokia and Java enable Device Software includes all the applications on your smartphone – email, organizer, media player, browser, calculator, mundu messenger and now the amazing mundu radio.

Mundu radio is feature-packed with rich UI and services like get lyrics, send lyrics, invite friends, managing playlist, dozens of pre-defined digital radio. In addition, if you have Wi-Fi or UMA enabled on your phone, enjoy the amazing Mundu radio without paying any data charges.

Mundu radio currently supports Nokia and Java enable phones.

So get-started and enjoy the exciting world of mundu on your Nokia and Java enable devices.

For download Mundu radio software pls click here...
(register first then download)

TV on mobile...


munduTV is the simplest way to watch TV.
Simple.

We've got whats called Technology Convergance working for us. So when you feel that you've missed out on something, you can just pick up the closest device near you and truly Catch up. Reading newspapers while travelling to work is now a thing of the past! You can watch live television – news, entertainment, sports, or any of your favourite programmes on your mobile phone or desktop, whenever and wherever you are.

Nothing says it like A good Knock Knock

We dont like to harp on but come on, we have

* A rich, seamless, TV-like viewing experience. (Honey, i shrunk the TV!)
* It's Plug and Play. Quick connectivity and less start-up time.
* Have internet. Will play. Service available across all networks – low bandwidth GPRS, 3G, Wi-Fi and broadband Internet.
* If you can type a text, you can use munduTV. The simplest navigation options that let you do Everything without reaching for a remote.
* You can view this no matter what your phone number is. Network operator independent.


The team believes that there's a reason why our product is the future. And we've given you

* Option to Pause live TV. (Go make some popcorn.)
* A personalized experience.(It's Your TV)
* Channel browsing complete with channel logo, quality profile of the content being viewed.
* Integrated Volume control with Quick mute option. (You're in charge)
* Pay once. Single subscription for all your devices – handheld, desktop, laptop.

With many more features lined up, we quote Tolkien yet again, "So it begins."

IF you want to download click here
(first of all need registration)

.: Change Google logo :.

.: Change Google logo :.

If you find this trick looks really cool, here’s how to make your own Google Logo Text. Please note that this trick only apply for firefox browser.

  1. First, you need to install the GreaseMonkey firefox add-on

  1. Next, install the required script

  • Once finished, head for Google.

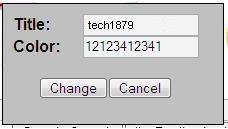
  • Double clicks the Google Logo and a box will appear similar to the figure below.


  • Now, you can type your own text ( letters and space ) and assign different color for each letter.

  • In color edit box, type the numbers: 1 – blue, 2 – red, 3 – yellow, 4 – green or other – random.

  • Click the “Change” button when finished and you will noticed the new Google Logo Text. :D

.: Mobiola® Web Camera :.

.: Mobiola® Web Camera 3 :.

Turn your camera phone into a high quality wireless (WiFi or Bluetooth) or wired (USB) web camera. Mobile phone as webcam with Mobiola® Web Camera 3


http://image.wareseeker.com/software/Windows-Widgets/Webcams/details_mobiola-webcam-lite-1.0.jpg

Main Functionality

  • Transforms your mobile phone into a high-quality PC webcam.
  • Connects mobile phone to PC using USB, WiFi (select models) and Bluetooth connectivity.
  • BlackBerry Storm supported (USB connection).
  • Wi-Fi support for BlackBerry phones.
  • High Video transmission speed.
  • Screen Capture functionality, when device screen can be demonstrated on PC real-time.
  • Cool video effects. Have fun and impress your friends!
  • Works with Skype, Yahoo, YouTube, MSN, AOL IM, ICQ and many others as standard USB webcam.
  • Compatible with Symbian S60 and UIQ, Windows Mobile 5 and 6, Blackberry.
Watch Video about Mobiola™Web Camera
Thank you for your interest! Try Mobiola® webcam and start using your camera phone as webcam!

for more detail click here
& Download trial and Full

Its password is MOBIOLA_FULL

.: Fring- make FREE mobile calls, video call & live chat :.

.: Fring- make FREE mobile calls, video call & live chat :.


fring is a free mobile application that lets users communicate with friends on popular networks over their mobile phone's internet connection.

fring users make free mobile calls, video calls, live chat & more, from their mobile phone with all their friends on fring & other internet services like Skype®, MSN Messenger®, GoogleTalk™, AIM®, ICQ® , Facebook® & Twitter, all through one central, integrated phone book. See the full feature list here.

fring is completely free. It's free to download and free to use to make calls, video calls, instant messages and more, all via your mobile phone's internet connection (over 'IP').

fring has millions of users on 1000s of supported mobile devices across approximately 200 countries, and is growing exponentially – adding more than half a million new users every month. Start fringing today!

Download fring free now.

How can fring be free?
fring uses your mobile device's internet to let you keep in touch without breaking the bank. fring relies on your data plan/Wi-Fi for chats, calls and video calls. fring does not use your valuable voice minutes or SMS.


for more detail and download Fring click here

.: Digsby (multiprotocol IM client) :.

.: Digsby :.

hello friends ,

Instant Messaging
digsby is a multiprotocol IM client that lets you chat with all your friends on AIM, MSN, Yahoo, ICQ, Google Talk, and Jabber with one simple to manage buddy list.

Email Notifications
digsby is an email notification tool that alerts you of new email and lets you perform actions such as 'Delete' or 'Report Spam' with just one click.

Social Networking

digsby is a social networking tool that alerts you of events like new messages and gives you a live Newsfeed of what your friends are up to.

free download
for Windows , for Mac , for Linux

.: 4 power tools for students :.

4 power tools for students from microsoft

Your kids can do a great job with even the toughest school projects with just a computer running Windows and the right information resources. Research no longer requires a trip to the neighborhood library because a whole world of information—and the tools to put it all together—are right at home on your family computer.

Picture of a school paper with an A+ stamped on it

Here are four homework power tools that can turn your children's ho-hum project into A+ work:

These four tools working together will truly enrich your student's study experience.

Microsoft Math 3.0

If your middle-school or high-school student is looking for just one resource to help them save time and complete high-quality math and science homework, Microsoft Math 3.0 is it. From basic math to precalculus to physics, Microsoft Math helps students visualize and see mathematical and scientific concepts as they’ve never seen them before. It gives them step-by-step instructions to help them tackle even the most difficult problems, while gaining a deeper understanding of fundamental concepts.

Microsoft Math includes:

  • Step-by-step instruction to help solve difficult math problems with the Step-by-Step Equation Solver

  • A full-featured graphing calculator with large 2-D and enhanced 3-D color graphs to better illustrate problems and concepts

  • The Formulas and Equations Library—a resource with more than 100 commonly used equations and formulas to help you identify and apply the right one for your problem

  • The Triangle Solver—a graphing tool that helps you explore and better understand triangles and their parts

  • The Unit Conversion Tool—a handy tool that quickly and easily converts units of measure including length, area, volume, weight, temperature, pressure, energy, power, velocity, and time

  • Ink Handwriting Support—that works with Tablet PCs and Ultra-Mobile PCs and recognizes handwritten problems


3-D graphing capability in Microsoft Math enables students to fully visualize math steps and problems.

Microsoft Office PowerPoint 2007

Microsoft Office PowerPoint 2007 can help your kids put all the information they gather together into a dazzling presentation.

An easy-to-use but sophisticated program, PowerPoint 2007 includes dozens of ready-made templates, but it also allows students to design their own look and feel. Your students can simply plug in their information, choose the slide transitions they want, and give their presentations in the classroom.

Tip: You can learn more about PowerPoint 2007 by viewing one of the online demos on the Microsoft Office Online Web site.


Microsoft Office OneNote 2007

For students and educators who gather and interpret data from multiple sources, collaborate with peers, juggle classes, meetings, social activities, and more, Microsoft Office OneNote 2007 is a note-taking program that makes it easy to take, organize, manage, and reuse notes more productively.

Unlike paper systems or word processing applications, OneNote 2007 combines the ability to capture typed and handwritten text, diagrams, Web page content, and audio notes in one place with the flexibility to organize and reuse them any way you want. There are many ways OneNote 2007 can help your kids in their studies—they can use it to record lectures, create outlines, and take notes when they do research online.


Microsoft Office Online Clip Art

No presentation would be complete without some kind of art—a photo, drawing, cartoon, or media clip.

Your students can use the clip art in PowerPoint 2007, and they can get free access to more than 150,000 pieces of art, photos, sounds, and animation on the Microsoft Office Online Clip Art and Media site.

To download free clip art, your kids just:

  1. Go to the Clip Art and Media site.

  2. Search the clip art for something they like.

  3. Click the checkbox beneath the art they want.

  4. Click the Download link.

The site copies the art to the computer, and your student can plug it into their presentation or print it with their report.

Each of these tools makes it easy for your student to research and create school projects. But even more importantly, these homework power tools can open your children's minds to a world of curiosity, ideas, inspiration, and creativity.


-: http://www.microsoft.com/athome/students/studentpowertools.aspx

.: 4 steps to set up your home wireless network :.

4 steps to set up your home wireless network from Microsoft


You can use a wireless network to share Internet access, files, printers, and more. Or you can use it to surf the Web while you're sitting on your couch or in your yard. Plus, it's easier to install than you think.

man with a laptop in a hammock

Note: For Windows Vista users, we recommend installing Windows Vista Service Pack 1 before setting up your wireless network. For Windows XP users, we recommend installing Windows XP Service Pack 3. Although the service pack is not required for wireless networking, it does make things much easier and helps protect you against hackers, worms, and other Internet intruders.

1. Choose your wireless equipment

2. Connect your wireless router

Since you'll be temporarily disconnected from the Internet, print these instructions before you go any further.

First, locate your cable modem or DSL modem and unplug it to turn it off.

Next, connect your wireless router to your modem. Your modem should stay connected directly to the Internet. Later, after you've hooked everything up, your computer will wirelessly connect to your router, and the router will send communications through your modem to the Internet.

How to go wireless

Next, connect your router to your modem:

Note: The instructions below apply to a Linksys wireless router. The ports on your router may be labeled differently, and the images may look different on your router. Check the documentation that came with your equipment for additional assistance.

  • If you currently have your computer connected directly to your modem: Unplug the network cable from the back of your computer, and plug it into the port labeled Internet, WAN, or WLAN on the back of your router.

  • If you do not currently have a computer connected to the Internet: Plug one end of a network cable (included with your router) into your modem, and plug the other end of the network cable into the Internet, WAN, or WLAN port on your wireless router.

  • If you currently have your computer connected to a router: Unplug the network cable connected to the Internet, WAN, or WLAN port from your current router, and plug this end of the cable into the Internet, WAN, or WLAN port on your wireless router. Then, unplug any other network cables, and plug them into the available ports on your wireless router. You no longer need your original router, because your new wireless router replaces it.

wireless modem lights

Next, plug in and turn on your cable or DSL modem. Wait a few minutes to give it time to connect to the Internet, and then plug in and turn on your wireless router. After a minute, the Internet, WAN, or WLAN light on your wireless router should light up, indicating that it has successfully connected to your modem.


3. Configure your wireless router

wireless cables

Using the network cable that came with your wireless router, you should temporarily connect your computer to one of the open network ports on your wireless router (any port that isn't labeled Internet, WAN, or WLAN). If you need to, turn your computer on. It should automatically connect to your router.

Next, open Internet Explorer and type in the address to configure your router.

You might be prompted for a password. The address and password you use will vary depending on what type of router you have, so refer to the instructions included with your router.

As a quick reference, this table shows the default addresses, usernames, and passwords for some common router manufacturers.

Router

Address

Username

Password

3Com

http://192.168.1.1

admin

admin

D-Link

http://192.168.0.1

admin


Linksys

http://192.168.1.1

admin

admin

Microsoft Broadband

http://192.168.2.1

admin

admin

Netgear

http://192.168.0.1

admin

password

Internet Explorer will show your router's configuration page. Most of the default settings should be fine, but you should configure three things:

  1. Your wireless network name, known as the SSID. This name identifies your network. You should choose something unique that none of your neighbors will be using.

  2. Wireless encryption (WEP) or Wi-Fi Protected Access (WPA), which help protect your wireless network. For most routers, you will provide a passphrase that your router uses to generate several keys. Make sure your passphrase is unique and long (you don't need to memorize it).

  3. Your administrative password, which controls your wireless network. Just like any other password, it should not be a word that you can find in the dictionary, and it should be a combination of letters, numbers, and symbols. Be sure you can remember this password, because you'll need it if you ever have to change your router's settings.

The exact steps you follow to configure these settings will vary depending on the type of router you have. After each configuration setting, be sure to click Save Settings, Apply, or OK to save your changes.

Now, you should disconnect the network cable from your computer.

4. Connect your computers to the wireless network

If your computer does not have wireless network support built in, plug your network adapter into your USB port, and place the antenna on top of your computer (in the case of a desktop computer), or insert the network adapter into an empty PC card slot (in the case of a laptop). Windows will automatically detect the new adapter, and may prompt you to insert the CD that came with your adapter. The on-screen instructions will guide you through the configuration process.


-:http://www.microsoft.com/athome/organization/wirelesssetup.aspx

 
Ask a Question on Tech1879